Welcome to the very first recipe on Veg Recipes Only! To kick off this journey into delicious, globally inspired plant-based cooking, it only makes sense to start with a true foundational staple: classic homemade hummus.
Whether you are hosting a gathering, looking for a healthy midday snack, or trying to elevate your wraps and sandwiches, hummus is the undisputed king of vegetarian dips. However, if you have only ever eaten hummus from a plastic tub from the grocery store, you are missing out on the true magic of this dish. Store-bought versions often lean heavily on preservatives, lack the bright punch of fresh lemon, and tend to have a dense, pasty texture.
Today, we are going to change that. In this comprehensive guide, you will learn the secrets to achieving that ethereal, cloud-like, restaurant-quality creaminess right in your own kitchen. You will discover exactly why certain ingredients matter, the techniques that make a difference, and how to customize this classic dip to suit your every craving. Grab your food processor, and let’s dive into the ultimate homemade hummus!
Why Homemade Hummus Beats Store-Bought Every Time
Making hummus at home might seem like an unnecessary extra step when it is so readily available at any supermarket, but the benefits of the DIY approach are monumental:
- Unbeatable Freshness and Flavor: The flavor of freshly squeezed lemon juice and raw garlic simply cannot be bottled. Store-bought brands must pasteurize their products to extend shelf life, which mutes the vibrant flavors of the raw ingredients.
- Texture Control: You get to decide exactly how thick, thin, chunky, or silky smooth your dip will be.
- Cost-Effective: A can of chickpeas and a jar of tahini will yield multiple batches of hummus for a fraction of the cost of buying pre-made tubs. Over a year, this simple swap can save you a surprising amount on your grocery bill.
- No Unwanted Additives: Commercial brands frequently use cheaper oils like soybean or canola oil, alongside thickeners and preservatives. When you make it yourself, you control the quality of the olive oil and know exactly what is going into your body.
The Anatomy of Perfect Hummus: Ingredients Matter
Great hummus relies on just a handful of ingredients. Because the list is so short, the quality of each individual component heavily influences the final outcome.
1. The Mighty Chickpea (Garbanzo Beans)
You have two choices here: dried chickpeas cooked from scratch, or canned chickpeas.
- Dried Chickpeas: Cooking your own dried chickpeas with a pinch of baking soda yields the absolute best, softest beans, which translates to the creamiest dip. It takes planning, but it is worth it for purists.
- Canned Chickpeas: For convenience, canned beans are excellent. The trick is to boil them for an additional 10–15 minutes with a half teaspoon of baking soda until they are practically falling apart. This breaks down the tough skins and ensures a velvety texture.
2. High-Quality Tahini
Tahini a paste made from toasted, ground sesame seeds is the soul of traditional hummus. It provides the nutty depth and rich mouthfeel. Do not skimp on this! Look for a brand originating from the Middle East or Mediterranean regions, as they tend to use superior sesame seeds. The tahini should be runny and smooth, not stiff or overly bitter. If your tahini is separated, stir it vigorously before measuring.
3. Fresh Lemon Juice
Never use bottled lemon juice. The acidity of fresh citrus cuts through the richness of the tahini and olive oil, brightening the entire dish. Roll your lemons on the counter before slicing to maximize juice extraction.
4. Fresh Garlic
Garlic provides the necessary aromatic punch. However, raw garlic can sometimes be too sharp. Pro Tip: Mince your garlic and let it soak in the fresh lemon juice for 10 minutes before blending. The acid mellows the harsh bite of the allicin in the garlic, leaving you with a smooth, sweet garlic flavor.
5. Extra Virgin Olive Oil
Olive oil is traditionally drizzled over the top as a garnish rather than blended heavily into the dip itself, though a small amount in the food processor adds richness. Use a fruity, high quality extra virgin olive oil for the best finish.
6. Cumin and Salt
A pinch of ground cumin adds a subtle, earthy warmth that compliments the chickpeas perfectly. And, of course, salt is essential to make all these flavors pop.
7. The Secret Ingredient: Ice Water
Yes, freezing cold water is the ultimate secret weapon. Adding ice water while the food processor is running helps whip the tahini into a light, airy emulsion, transforming a heavy paste into a fluffy, cloud-like dip.
The Great Debate: To Peel or Not to Peel the Chickpeas?
If you search the internet for hummus tips, you will inevitably stumble upon the great chickpea peeling debate. Does peeling each individual chickpea make a smoother hummus? Yes, it does. The skins are fibrous and can leave tiny grain like textures in the final product.
However, peeling chickpeas by hand is incredibly tedious and time-consuming. We believe in easy, stress-free vegetarian cooking here at Veg Recipes Only!
The Lazy Alternative to Peeling: Instead of peeling, simply place your canned chickpeas in a saucepan, cover them with water, add a half teaspoon of baking soda, and boil them for 15 minutes. The baking soda is alkaline and breaks down the pectin in the chickpea skins. They will become incredibly mushy perfect for blending into a flawless purée without a single minute spent peeling.
Step-by-Step: The Technique for Flawless Emulsion
Throwing everything into a blender at once is the biggest mistake home cooks make. The order of operations is crucial for the perfect texture.
Step 1: Whip the Tahini and Lemon Begin by adding only the tahini and the fresh lemon juice to your food processor. Process for a full minute. Scrape down the sides, and process for another 30 seconds. This step “creams” the tahini, making it lighter in color and significantly fluffier.
Step 2: Add Aromatics Add the minced garlic (preferably soaked in the lemon juice as mentioned earlier), cumin, and salt. Process again to incorporate.
Step 3: Gradually Add the Chickpeas Add half of your over-cooked, drained chickpeas to the food processor. Blend for a solid minute. Add the remaining chickpeas and blend for another 1 to 2 minutes. The mixture might look a little thick and pasty at this stage that is completely normal.
Step 4: The Ice Water Drizzle With the food processor running continuously, slowly drizzle in the ice-cold water, one tablespoon at a time. Watch as the magic happens: the hummus will lighten in color, smooth out, and gain a beautifully whipped texture. Process for another 2 to 3 minutes. Patience is key here! The longer you blend, the better it gets.
Delicious Flavor Variations to Try
Once you have mastered this foundational recipe, consider it a blank canvas for your culinary creativity. Here are a few incredible variations to keep your snacking exciting:
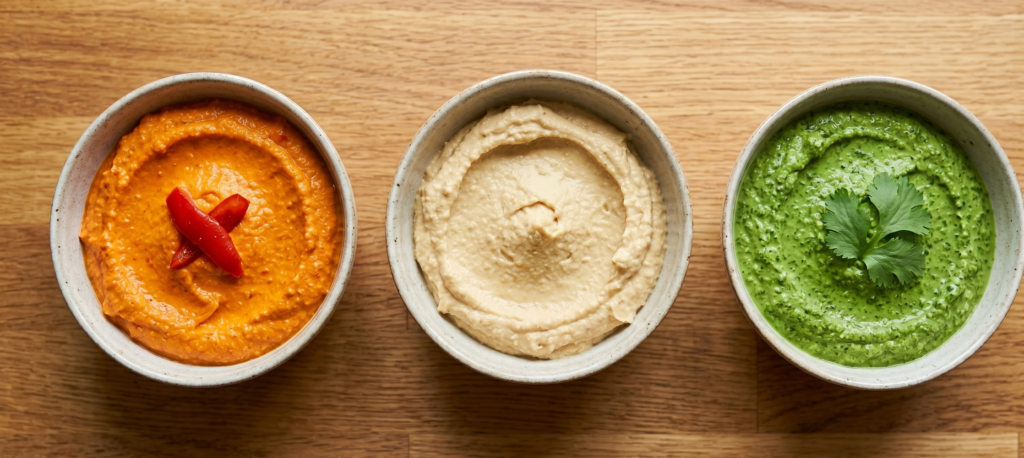
- Roasted Red Pepper Hummus: Add 1/2 cup of drained, jarred roasted red peppers (or roast your own) during the chickpea blending stage. It adds a gorgeous orange hue and a sweet, smoky flavor.
- Green Goddess Herb Hummus: Toss in a generous handful of fresh parsley, cilantro, and a few basil leaves. This results in a vibrant green dip that is incredibly refreshing.
- Spicy Jalapeño & Lime: Swap the lemon juice for lime juice, and blend in one or two roasted jalapeños (seeds removed if you prefer less heat). Top with fresh cilantro.
- Earthy Beetroot Hummus: Blend in a small, cooked red beet. Not only does this add a subtle, sweet earthiness, but it turns the hummus a show-stopping, vibrant magenta color that looks spectacular on a party platter.
- Kalamata Olive Hummus: Pulse in 1/2 cup of pitted Kalamata olives at the very end of the blending process so they remain slightly chunky.
Creative Ways to Serve Your Homemade Hummus
Hummus is far more versatile than just a dip for baby carrots. Here is how you can incorporate it into your daily vegetarian meals:
- The Ultimate Sandwich Spread: Ditch the mayonnaise and spread a thick layer of hummus on whole grain bread before piling on cucumbers, tomatoes, sprouts, and avocado.
- Salad Dressings: Whisk a few tablespoons of hummus with extra lemon juice, a splash of water, and olive oil to create a creamy, dairy free dressing for your favorite green salads.
- Nourish Bowls: Create a balanced Buddha bowl with quinoa, roasted sweet potatoes, steamed kale, and a massive dollop of hummus in the center to tie it all together.
- Stuffed Sweet Potatoes: Bake a sweet potato until tender, split it open, and stuff it with a generous scoop of hummus, roasted chickpeas, and a sprinkle of smoked paprika.
- The Mezze Platter: Serve it traditionally spread shallowly on a wide plate, creating a well in the center. Fill the well with high quality olive oil, a sprinkle of paprika, toasted pine nuts, and fresh parsley. Serve alongside warm pita bread, falafel, cucumber slices, and Kalamata olives.
Troubleshooting Common Hummus Issues
Even the best home cooks run into hiccups. Here is how to fix common hummus problems:
- Problem: It is too thick.
- Solution: With the food processor running, add more ice water, one tablespoon at a time, until you reach your desired consistency.
- Problem: It is too bitter.
- Solution: Bitterness usually comes from the tahini or the raw garlic. To balance it, add a little more salt, or a small splash of maple syrup or agave nectar to counteract the bitter notes.
- Problem: It lacks flavor.
- Solution: Hummus loves salt and acid. Add an extra pinch of salt and another squeeze of fresh lemon juice. Give it a stir and taste again.
- Problem: It is grainy.
- Solution: Keep blending! Sometimes it just needs another 3 to 4 minutes in the processor. If it remains grainy, your chickpeas likely weren’t soft enough before blending. Next time, boil them a bit longer with baking soda.
Frequently Asked Questions (FAQs)
Can I make hummus without tahini? Technically, yes, but it will lack the authentic flavor and creamy texture. If you have a sesame allergy, you can substitute sunflower seed butter or a neutral nut butter like cashew butter. If you just don’t have tahini on hand, you can add a little extra olive oil, but expect a different taste profile.
How long does homemade hummus last? Store your homemade hummus in an airtight container in the refrigerator. It will stay fresh and delicious for up to one week. You may notice it thickens slightly in the fridge; simply stir in a few drops of water or lemon juice to loosen it up before serving.
Can I freeze hummus? Yes! Hummus freezes remarkably well. Place it in a freezer-safe container, leaving a little room at the top for expansion. Freeze for up to 3 months. Thaw it overnight in the refrigerator. It may separate slightly after thawing, so give it a vigorous stir or a quick blitz in the food processor before eating.
Do I need a high-speed blender or a food processor? A food processor is generally best for making hummus, as the wide base allows the thick mixture to circulate evenly. A high-speed blender (like a Vitamix) can work and will make it incredibly smooth, but you will need to use the tamper tool extensively to push the thick paste down into the blades.
📋 The Official Veg Recipes Only Hummus Recipe
(Use your WP Recipe Maker Plugin to format this section on the live site!)
Prep Time: 10 mins
Cook Time: 15 mins (for boiling canned chickpeas)
Total Time: 25 mins
Servings: 6
Diet: Vegetarian, Vegan, Gluten-Free
Ingredients
- 1 can (15 oz / 425g) chickpeas (garbanzo beans), rinsed and drained
- 1/2 teaspoon baking soda (for boiling the chickpeas)
- 1/3 cup high-quality tahini, well-stirred
- 1/4 cup fresh lemon juice (about 1 large lemon)
- 1 large garlic clove, roughly chopped
- 1/2 teaspoon ground cumin
- 1/2 teaspoon fine sea salt (more to taste)
- 2 to 4 tablespoons ice-cold water
- Extra virgin olive oil, for serving
- Paprika and fresh parsley, for garnish
Instructions
- Boil the Chickpeas: Place the drained, rinsed canned chickpeas into a small saucepan. Cover them generously with water and stir in the baking soda. Bring to a boil over medium-high heat. Reduce the heat and simmer for 15 minutes, or until the chickpeas are very mushy and the skins are falling off. Drain in a fine-mesh strainer and rinse gently with cool water. Set aside.
- Mellow the Garlic: While the chickpeas boil, combine the chopped garlic and the fresh lemon juice in a small bowl. Let it sit for 10 minutes to mellow the garlic’s bite.
- Whip the Tahini: Pour the lemon juice and garlic mixture into your food processor. Add the tahini. Process for 1 full minute. Scrape down the sides of the bowl with a rubber spatula, then process for another 30 seconds until the mixture is thick, pale, and creamy.
- Flavor the Base: Add the ground cumin and sea salt to the food processor. Process for 30 seconds to combine.
- Blend the Chickpeas: Add half of the boiled, drained chickpeas to the food processor and blend for 1 minute. Add the remaining chickpeas and blend for another 1 to 2 minutes until thick and relatively smooth.
- The Ice Water Magic: With the food processor running, slowly pour in the ice water, one tablespoon at a time. Keep the machine running for a full 2 to 3 minutes. The hummus will transform into a light, whipped, perfectly smooth dip.
- Taste and Adjust: Stop the machine and taste. Add more salt or a squeeze more lemon juice if needed.
- Serve: Transfer the hummus to a serving bowl. Use the back of a spoon to create lovely swoops and swirls on the surface. Drizzle generously with high-quality extra virgin olive oil. Garnish with a sprinkle of paprika, fresh chopped parsley, and perhaps a few whole chickpeas.
- Enjoy: Serve immediately with warm pita bread, crisp vegetables, or your favorite crackers!